If you're craving a thick slice of bread, you have to try this Paleo Garlic Herb Bread! It's extremely easy to make, and you only need a few simple ingredients. Perfect for anyone who is gluten-free, dairy-free, or just loves bread!

Disclaimer: Some of the links in this post are affiliate links, which means I make a small commission if you choose to purchase through qualifying links.
Jump to:
Why I love this recipe
Whenever anyone asks me what I recommend for gluten-free bread, I have a hard time coming up with a brand! A lot of them are filled with additives, preservatives, fillers, and inflammatory oils. My Paleo Garlic Herb Bread is easy to make, doesn't require yeast, and uses only a few simple ingredients like almond flour, eggs, and coconut milk! Not only is it healthy, but it also has the perfect "bread-like" consistency. I've tried other bread recipes in the past, but they required yeast or ingredients I didn't have on hand. This is the easiest recipe, and you probably have all of the ingredients in your kitchen already!
🍴Recipe Ingredients

- Almond Flour - I have not tested this recipe with any other flour combination. My favorite almond flour brands are Bob’s Red Mill, and Blue Diamond. Both have a finely ground blend that doesn’t come out clumpy! Make sure it’s almond FLOUR and not almond MEAL. They have completely different textures.
- Baking Powder + Baking Soda - Together these two ingredients help the bread to rise without yeast!
- Garlic Powder - This adds a nice flavor to this bread recipe.
- Dried Thyme - You could also use 1 tablespoon fresh thyme. (My personal favorite.)
- Salt - I use a little more than I normally would with a baked good because it's a savory recipe!
- Eggs - I would not reccomend swapping the eggs for a replacement.
- Coconut Milk - Any non-dairy milk will work with this recipe.
- Apple Cider Vinegar - This helps to activate the baking soda! Do not skip this ingredient. If you don't have ACV, you could swap for lemon juice.
🍴Recipe Instructions
Making the Dough
- Start by adding the eggs, coconut milk, and apple cider vinegar into a mixing bowl. Whisk until fully combined.
- In a separate bowl add almond flour, garlic powder, salt, thyme, baking powder, and baking soda. Use a whisk or spoon to stir together. (The whisk helps to break up the flour clumps.)
- Next, pour the wet mixture into the dry mixture and fold together until the flour is absorbed.


Baking
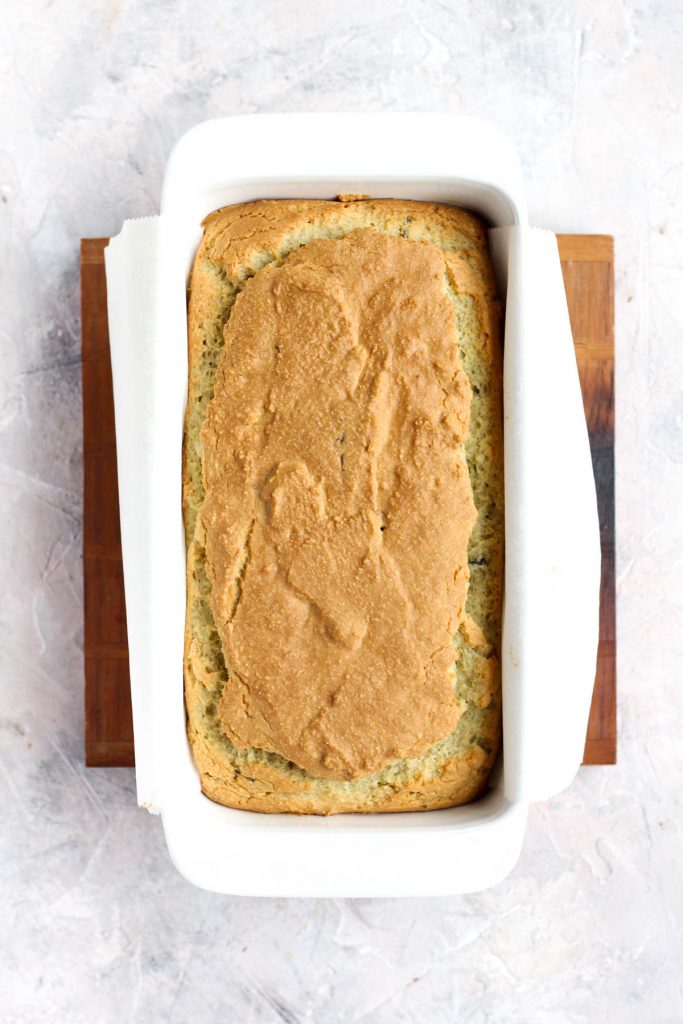
- Pour the dough into a greased bread pan. (Ideally lined with parchment paper!) Bake at 350 degrees for 50-55 minutes. You'll know it's done when the top is golden brown, and a toothpick comes out clean.
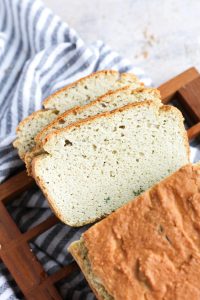
- When it's done, remove the bread from the oven, and let it cool for about 10 minutes. Then scrape around the edges, and use the parchment paper to pull it out of the pan. Place on a metal cooling rack for an additional 20-30 minutes. Slice and enjoy!

Helpful Tips
Once your bread comes out of the oven, it's important that it has time to cool and set. Place the pan on a metal cooling rack for about 45-90 minutes. When it has cooled for a bit, gently scrape the two narrow sides of the pan with a knife and pull it up with the parchment paper. Place it on the cooling rack, and pull the parchment paper out from underneath. If you leave it on the parchment paper too long, it will get soggy on the bottom. Once you've removed it from the pan you can slice into it! I usually let mine cool until it's at room temperature.
Frequently Asked Questions
Grease the edges, AND use parchment paper. Cut a piece of parchment paper that will fit in your loaf pan. (One long strip.) Lay the strip on the bottom of your baking pan, and press inside so it stays down. The coconut oil will help it to stick to the bottom and edges. Pour your batter on top. Make sure you leave enough parchment paper sticking up on either side so you can pull it out after it's done baking.
I would not suggest swapping out almond flour for any other flours. I have not tested this recipe with anything other than almond flour.

How to store leftovers
I usually store mine on the counter at room temperature the first day, and then I put it in the refrigerator. (I usually don't cover it so it doesn't get too moist!) It also freezes well! To freeze - pre-slice the loaf, and put in an air tight glass container.
More recipes you'll love!
- Gluten-Free Focaccia Bread
- Whole30 Tomato Basil Soup
- Paleo Creamy Chicken Soup
- Whole30 Stovetop Beef Chili
- Gluten-Free Baked Meatballs (Whole30)
After you make this Paleo Garlic Herb Bread, make sure to leave a comment & rate the recipe! Your feedback is helpful for me, and for anyone planning to try this recipe. I hope you love it as much as I do!
Recipe
Paleo Garlic Herb Bread (No Yeast!)
Equipment
- 9x5x3 Bread Pan
Ingredients
Dry Ingredients
- 4 Cups Almond Flour
- 1+½ Teaspoons Baking Powder
- 1 Teaspoon Garlic Powder
- 1 Teaspoon Dried Thyme Or 1 tablespoon fresh thyme.
- 1 Teaspoon Salt
- ½ Teaspoon Baking Soda
Wet Ingredients
- 4 Eggs
- 1 + ¼ Cups Coconut Milk
- ½ Tablespoon Apple Cider Vinegar
Instructions
Making the Dough
- Start by adding the eggs, coconut milk, and apple cider vinegar into a mixing bowl. Whisk until fully combined.
- In a separate bowl add almond flour, garlic powder, salt, thyme, baking powder, and baking soda. Use a whisk or spoon to stir together. (The whisk helps to break up the flour clumps.)
- Next, pour the wet mixture into the dry mixture and fold together until the flour is absorbed.
Baking
- Pour the dough into a greased bread pan. (Ideally lined with parchment paper!) Bake at 350 degrees for 50-55 minutes. You'll know it's done when the top is golden brown, and a toothpick comes out clean.
- When it's done, remove the bread from the oven, and let it cool for about 10 minutes. Then scrape around the edges, and use the parchment paper to pull it out of the pan. Place on a metal cooling rack for an additional 20-30 minutes. Slice and enjoy!
Notes
Helpful Tips
Once your bread comes out of the oven, it's important that it has time to cool and set. Place the pan on a metal cooling rack for about 45-90 minutes. When it has cooled for a bit, gently scrape the two narrow sides of the pan with a knife and pull it up with the parchment paper. Place it on the cooling rack, and pull the parchment paper out from underneath. If you leave it on the parchment paper too long, it will get soggy on the bottom. Once you've removed it from the pan you can slice into it! I usually let mine cool until it's at room temperature.Frequently Asked Questions
How to store leftovers
I usually store mine on the counter at room temperature the first day, and then I put it in the refrigerator. (I usually don't cover it so it doesn't get too moist!) It also freezes well! To freeze - pre-slice the loaf, and put in an air tight glass container.Nutrition
Shop the Recipe
 Buy Now →
  Buy Now →
  Buy Now →
  Buy Now →
  Buy Now →
 Want more recipes?
Check out my recipe box where you can browse by season, diet, and flavor!


Britt
I thought I would comment this because I was able to calculate it!
Nutrition Facts
Serving size: 1 slice
Servings: 6
Amount per serving
Calories 75
% Daily Value*
Total Fat 6.1g 8%
Saturated Fat 0.8g 4%
Cholesterol 55mg 18%
Sodium 271mg 12%
Total Carbohydrate 2.3g 1%
Dietary Fiber 1.1g 4%
Total Sugars 0.5g
Protein 3.9g
Vitamin D 5mcg 26%
Calcium 30mg 2%
Iron 1mg 4%
Potassium 23mg 0%
*The % Daily Value (DV) tells you how much a nutrient in a food serving contributes to a daily diet. 2,000 calorie a day is used for general nutrition advice.
Recipe analyzed by
[email protected]
Ahh thank you for sharing!! (:
[email protected]
Let me know if you give them a try. (:
Mariah Mandile
I'm sorry to hear that!! I've made it quite a few times and never had an issue. Did you swap out any of the ingredients?
Lindsey
Holy moly is this good! The flavors, the textures, the smell! It's wonderful. I will be making this many many more times! Thanks for the recipe!
Mariah Mandile
Oh yay!! I'm so glad you enjoyed it! (: