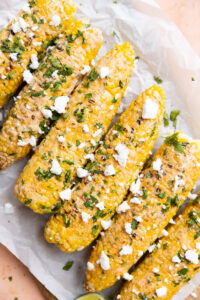
Dairy-Free Mexican Street Corn
Dairy-Free Mexican Street Corn, also known as Elote, is a delicious way to enjoy corn all spring and summer long! The corn is grilled in the husk and topped with a creamy homemade sauce, fresh cilantro, and feta cheese.
Equipment
- 1 Grill
Ingredients
- 6 Ears of Corn
- ¼ Cup Dairy-Free Feta I used the brand Miyokos.
Creamy Sauce
- ⅓ Cup Mayo I used Primal Kitchen Avocado Oil Mayo.
- 2 Tablespoons Fresh Lime Juice
- 1 Tablespoon Chopped Cilantro
- ½ Teaspoon Garlic Powder
- ½ Teaspoon Salt
- ½ Teaspoon Chili Powder
- ¼ Teaspoon Paprika
Instructions
Preparing the Corn
- Start by peeling back the husk and removing the white fibers. Then peel the husk back over the corn and place in a large casserole dish with water. Repeat with all 6 ears of corn.
- Next, let the corn soak for 30 minutes to ensure that it does not catch fire on the grill.
Creamy Sauce
- While the corn is soaking, add all sauce ingredients into a small bowl. Whisk together until smooth and creamy. Place in the refrigerator to chill.
Grilling
- Grill the corn at 375 degrees for 15 minutes on each side.
Finishing Touches
- Remove the corn from the grill and pull back all of the husks. For a charred flavor, grill the corn without the husks for a few minutes on each side. Place the corn on a large plate.
- Spread a generous amount of the creamy sauce onto each piece of corn. Top with fresh cilantro and feta cheese. Enjoy hot!
Notes
Expert Tips
- For grill marks, remove the husks after 30 minutes and cook for a few minutes on each side.
- This dish is best served fresh. Make sure you grill the corn and add the toppings when you're ready to eat!
- Stick a wooden skewer through the bottom of each piece of corn before serving to make it easier to grab and eat.
- To make this recipe spicier, just add about ¼ teaspoon of cayenne pepper into the creamy sauce or sprinkle some hot sauce on top of the corn before serving.
- Use a silicone brush to add the creamy sauce onto the grilled corn. It's easy to use, and you can throw it right in the dishwasher!
- Meal prep the grilled corn and sauce ahead of time and heat the corn in the air fryer or microwave before serving!
How To Store Leftovers
To easily store leftovers, use a sharp knife to cut off the corn kernels and place them in an airtight container in the refrigerator. You can also store the corn on the cob in tin foil or reusable storage bags. ** See full post for more information and step by step photo instructions.Nutrition
Serving: 1ServingCalories: 181kcalCarbohydrates: 18gProtein: 4gFat: 12gSaturated Fat: 3gPolyunsaturated Fat: 6gMonounsaturated Fat: 3gTrans Fat: 0.03gCholesterol: 11mgSodium: 361mgPotassium: 264mgFiber: 2gSugar: 6gVitamin A: 300IUVitamin C: 8mgCalcium: 35mgIron: 1mg
Did you make this recipe?Tag @freshwaterpeaches on Instagram!